 At the
 Our tent arrived from CVT the day before the 2012 Overland Expo. Actually what I really mean is the ‘night’ before. We quite literally began installing the tent on the BajaRack Utility Rack at 5 in the evening, luckily the sun was still out for a while and the job was pretty much done before dark.
The included instructions are very well done, although it seems that the same instructions are used for most CVT tents. Also, the changing room did not include any instructions, which made that setup interesting in the Arizona wind. The tent is mounted to the roof with an aluminum channel that holds bolts, which use an aluminum plate to wrap around your roof rack. Luckily this system works with most roof racks, including the BajaRack on our FJ as well as a custom built rack on our associates T100 (See the September issue of Tacoma Magazine for more).
Before mounting the tent, the aluminum channels have to be mounted to the tent floor. They’re attached in three places along the length via bolts through the floor (don’t worry, those bolts are covered by the mattress). This system works well and provides a very solid mount, but a couple of the holes in the floor of the tent didn’t line up well. We even had to drill one out to get the channel properly mounted. Still, it didn’t take long to get the channels mounted and we were ready to push the tent onto the roof.
At approximately 140lbs, this tent is much lighter than some, so you would think two able bodied men could lift it onto the FJ Cruiser without much effort. You would be wrong. It’s not that it’s super heavy, but there are no ‘handles’ and an overland equipped FJ with rear bumper racks, a 3” lift, and a sloping driveway made this a bit of a pain to slide onto the roof. The truck even has a couple of dings on the top of the back door as proof of our difficulty. As it turns out though, this was the easy part of mounting the tent.
As much as I LOVE the BajaRack Utility rack (and I do, see page 34 for all the details), it’s not super easy to mount accessories to. Since the middle of the rack is only a couple of inches from the roof (in order to keep the low profile) getting a wrench between the rack and the roof was a trying feat. Of course since I didn’t have ratcheting wrenches at the time (that problem was solved on Father’s Day), we had to turn each of the 8 nuts to mount the rack about ½ turn at a time. The result: torquing down the last nut just as the final sliver of dusk turned to night. I estimate that the lack of proper tools cost us at least an hour of wrenching time that night. Total install time: around 2 hours with the proper tools.
We were able to pop the tent fully open for the first time around 9pm the night before our 12+ hour drive to Arizona for the Overland Expo. We threw some sheets, blankets, and pillows into the tent, inspected the accessories (fly poles, changing room, stakes, etc), and folded her back up. The cover went on fairly easily after a little coaxing to get the zipper started. We learned very quickly to tuck the extra tent fabric in very well, otherwise we spent several minutes un-sticking the zipper for the cover.
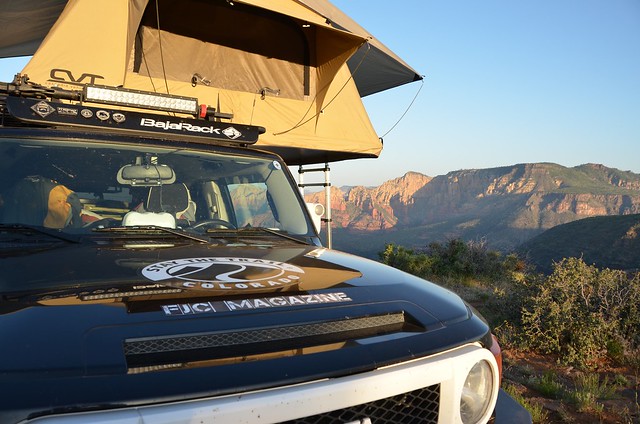
The next morning I snapped a quick pic of the FJ ready and loaded for the Expo, and we headed south in a hurry. Quite surprisingly we didn’t lose too much gas mileage (approximate 1mpg) with the added profile from the tent. Power loss on steep hills was noticeable, but not unbearable considering the weight of the tent and all of our overlanding gear. Overall I think it travels nice and is a good compliment to the FJ if a roof top tent is for you.
Less than 24 hours after we finished mounting the tent, Jim Akers (Managing editor for Tacoma Magazine) and I were on the edge of Schnebly Hill Road, overlooking Sedona, AZ. The first night produced a little wind, but nothing very noticeable. Once we had all the pics we needed, it was a 5 minute job to pack the tent up and head down the hill.
We had the opportunity to run Broken Arrow Trail while in Sedona before heading back north for the Expo, so since it’s one of the most noteworthy trails in the state we couldn’t pass it up. The FJ handled very well on the difficult parts of the trail with the CVT up top. Going down “The Steps” I did notice the nose dropping a little quicker than normal, which is to be expected with an additional 160lbs on the roof. Overall I was happy with the way the FJ handled while carrying the tent. For overland and general camping use, this is a great option. However I wouldn’t do terribly difficult trails while carrying the tent unless I upgraded to heavy duty coil springs.
Jim got to spend most of the first nights in the tent at the Expo. He learned a lot about the CVT, the FJ, and Arizona wind in his three nights up top. We estimate that the winds topped 60mph gusts overnight, and other than one fly rod fleeing at 3am, the tent held up perfectly. There was plenty of flapping in the wind, but nothing broke. The only sign of the extreme conditions is a slightly deformed grommet where one of the fly poles goes into the tent frame. After surviving those few nights in the heat & wind, I’m certain this tent will be around for a long while.
After the Expo Angie & I decided to hit the Grand Canyon, since neither of us has ever had the opportunity. It also provided us a good excuse to check out the tent for family sleeping, which ended up being quite the challenge with a two year old. Unfortunately Brenden hasn’t started sleeping in a toddler bed yet, so he’s used to rolling around in a crib as much as he wants. That doesn’t bode to well in a tent (even a large one like the Mt. Hood). After he initially went to sleep OK, but once we were in the tent he rolled around and kicked both Angie & I repeatedly. Our one-night solution to this problem was to open the Pack-N-Play inside the tent; after that he was nice and contained.
The tent is now on the back of our friend Tim’s T100 pickup, and will spend some time on Jim’s Tacoma as well as a Ruger Trailer this summer. We’ll spend plenty more nights in the CVT Mt. Hood this year, so watch our Facebook page and future issues for details on how she holds up.
More Photos!
[flickr set=72157631098734236]
To get your copy of the July 2012 issue of FJC Magazine:

NOTE: Internet Explorer users should right click and select "Save Target As"