
FJ Cruiser Lighting Upgrade

 Our 2007 TRD SE FJ Cruiser will turn 100,000 miles any day now, and it’s served us very well for hundreds of adventures. Although we installed a dual-battery system in 2012, we’re still working on lighting upgrades as part of the Extreme Makeover: FJC project we started last year. For our latest project we decided to replace our headlights, side lights, and tail lights with upgraded versions.
Front Headlights/Side Marker Lights
One benefit of having nearly 100k and dozens of mods (all written up for the best Toyota magazine on the planet) is familiarity with the front-end of our FJ Cruiser. We’ve had the bezel and various other front end-parts out so many times it’s amazing any of the plastic clips still work. So needless to say getting things ready for the headlight & side marker light swap wasn’t difficult.
 Swapping these lights is one of the easiest mods to do, and the different look on the front of our whited-out TRD SE really makes this a worthwhile project, despite the cost
1) Remove the bezel and bolts holding the headlight assembly in
2) Carefully pop the small bottom fascia out, it’s under the headlight
NOTE: 100k makes these clips very brittle…we snapped the passenger side clips and are awaiting a replacement part
3) Remove the blinker bulb from the side marker lights, remove the bulb from the holder
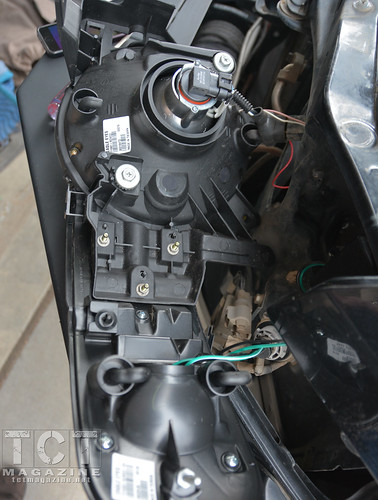
4) Remove the headlight assembly by removing the bolt holding it in and carefully popping the remaining plastic clips. A removal tool or flathead screwdriver make this a little easier
5) Turn the OEM assembly over and remove the 3 nuts holding the side marker lights to the headlight
6) Mate the new side marker and headlight assembly using the 3 nuts you just removed
7) Lay the new assembly on your bumper so you can work on wiring:
a. The side marker plug & headlight use the OEM harnesses
b. For the Halo, wire it to a switch, or if you’d like it to come on with headlights, wire it to the red/blue (top wire) on the headlight connector
8) Mount the relay boxes for the side marker & halo anywhere that makes sense
9) Re-install the assembly by pressing firmly until all the clips engage
10) Re-install the bottom fascia
11) Re-install the bolt holding the assembly in.
12) Repeat steps 2-11 for the other side
13) Re-install the bezel
 Rear LED Lights
Since we’ve seen these lights in FJCs for years, we figured this very common mod wouldn’t be too difficult to accomplish. Apparently we were mistaken.
The theory of this install is simple enough: remove a panel or two, disconnect wiring, remove nuts, replace the light, re-install everything. Sure, except for that ONE nut on the outside of the assembly is nearly impossible to reach with a ratchet or a wrench. So be prepared to spend 1-2 hours working on 2 nuts (one on each side). Here we go:
2) Remove the bolts and rack (or holders) on the side panel and prop it open
NOTE: Sorry, we don’t have many photos for some of these steps
3) Remove the bulbs from the OEM assembly, safeguard them & note which hole each color came from.
4) Use a wrench to remove the 3 nuts holding the OEM assembly in. Note that these nuts are on a long shaft so you won’t be able to use a standard ratchet. This pic shows the outside where the 3rd nut is located.
a. The furthest outside nut is exceedingly difficult to remove, you have to reach behind the side panel to get to it. In the blind. Keep trying, you’ll get it.
5) Once you have the assembly out, get your new LED assembly ready.
a. I modified the outer shaft on my LEDs to allow for easier re-installation. I cut the shaft by about 1.5” so I could get my wrench on the nut easier.
6) After installing the new assembly, add the new relay into the wiring harness according to the directions, and install all the wires.
7) Make sure you check turn signals, brakes, and reverse lights to make sure no wires got crossed.
Headlights with Halo: MSRP: $540/pair
Side LED Marker Lights: MSRP $332/pair
Rear LED Lights: $397/pair

All Photos!
[flickr set=72157644274540688]
To get your copy of the April 2014 issue of TCT Magazine:


