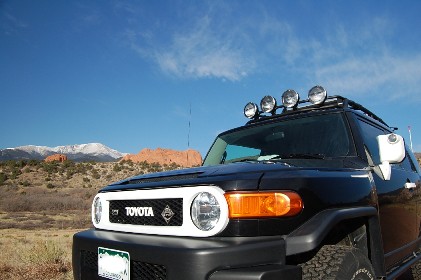
This is one of the least expensive mods you can do, but it does take quite a bit of time and patience. You’ll need to have a well ventilated, dust free environment to properly paint all of your silver pieces. While most owners choose to paint external silver accents only, we decided to paint ALL the silver on the FJ including the interior parts. . This increased the amount of paint we needed by about four times, we blasted through 8 rattle cans to get three coats on everything. The key to making our TRD unique was consistency. All silver accents that are typically blacked out, we painted white. But added black matte paint to the silver portions of both bumpers. It really changed the look and feel of the whole truck and we love it!
In addition to a proper work area, other safety precautions include a VERY good respirator, you’ll need something more than a paper filter to ensure you don’t inhale paint fumes. And a rattle can handle, which makes using the paint cans much easier and results in more consistent coats.
List of items we whited out:
- Mirrors
- Exterior Door Handles
- Bezel
- Toyota emblem and FJ Cruiser on rear door
- Interior vent pieces
- Radio side-trim
- Interior door handles
- Steering wheel
- Gauge Cluster Cover
- Radio knobs
Blacked out pieces:
- Bumper wings
- Bumper trim
First step, remove your pieces
Removing all your interior & exterior trim pieces is not as difficult as you may think. There are plenty of resources online to assist you with that. We really like Steve’s interior parts removal writeup (http://tinyurl.com/bwr3ru) and this writeup on how to remove the mirrors (http://tinyurl.com/bgb75g). Removing the interior door handles is as simple as popping the door panel off & unscrewing the handle from the back side.
Prepare Your Parts
After all the parts you’re working on are off the truck, you’ll need to get them ready for painting. The more time you take with this, the better the end product will be. Make sure you sand each part to ‘rough’ it up so that paint will stick to it. Although we used ‘Plasti-Kote’ paint, which is designed to go straight on plastic with no preparation, we thoroughly sanded & cleaned each part before we masked it.
Perhaps the most important (and time consuming) part of any paint project is masking. You’ll want to take plenty of time to properly tape off anything you don’t want painted. A small utility razor (Xacto knife) with a sharp blade is ESSENTIAL in preparing many of your parts. Make sure you get tape as far into the cracks & crevices of your parts as you can. Pay particular attention to the steering wheel cover, vents, and side marker lights on the mirrors. If you’re not sure you’ve covered something adequately, add a little extra tape. You don’t want white paint anywhere it doesn’t belong.
Hanging Parts
We got the best results out of our rattle cans by hanging the parts on a bungee cord attached to the ceiling of the garage. This system allows 360 degree access to the part and cuts down on the amount of ‘paint dust’ that falls on the item. Not all parts have a good place to hook a bungee, but most items can be suspended this way.
Take Plenty of Time
Next to proper masking, the patience to use many light coats is the most important tip. Start early in the day so you have plenty of time between coats for proper drying. We had to re-do several pieces because we didn’t wait long enough between coats and/or used too much paint at once. We used a minimum of three coats on most pieces, but went up to 5 on others. Even then we had to re-do the mirrors a few months later due to chipping. The bottom line is, the more coats you put on now, the less chance you’ll have to re-do this process later.
Curing Time
Once you get all your paint on, we recommend letting your parts dry at least overnight, longer if you can manage it. If you try to remove the mask and/or install the parts before the paint has had enough time to properly cure, you risk chipping or peeling the paint in critical masked areas. The temperature of your work area will also affect cure time. If you're using a garage, consider adding a portable heater to help the paint cure completely overnight.
Reinstallation
Once your parts have cured enough, very carefully remove the tape. Peel it back slowly along the edges to avoid chipping & peeling. It’s a good idea to have some Goo Gone or mineral spirits handy to wipe up any overspray. You’ll also want a light soap & water solution & lint free rag to wipe off any paint dust that remains. At this point you can re-install all your parts, just reverse the process you used to remove them.
You’ll really be amazed at how this mod (especially in white) transforms the truck. We really love the ‘Whited Out’ TRD and hope you love your new truck too!
Have you painted your silver parts? We’d love to see it! Send pics of your whited/blacked out FJ to
{tab=Photos}
[flickr set=72157626493776548]
{/tabs}

 Many FJ Owners have painted the silver on the outside of their FJ. The most common mod of this type is to rattle can the mirrors, door handles, bezel, and bumper wings in flat or matte black. TRD’s that are ‘blacked’ out are very popular, so we thought we’d try something different. When we started discussing doing this mod to our TRD, Angie reminded me of an awesome FJ we saw on the trail. Early in 2008 we did a couple of runs with Jock (RockyMtnHigh), who has an awesome ‘whited out’ Brick FJ. Instead of the traditional black, he painted most of his silver trim pieces bright white. What Angie & I both loved about this mod is that it not only makes the truck stand out more, but it also really enhances the ‘retro’ FJ-40 look. Which we feel is commemorated in the “white out” of our TRD.


